
In this tutorial we will explore the various options offered by PowerApps to send a mail with Office Connector.
Prerequisite
1. In Data Panel, search Office and click on Office 365 Outlook

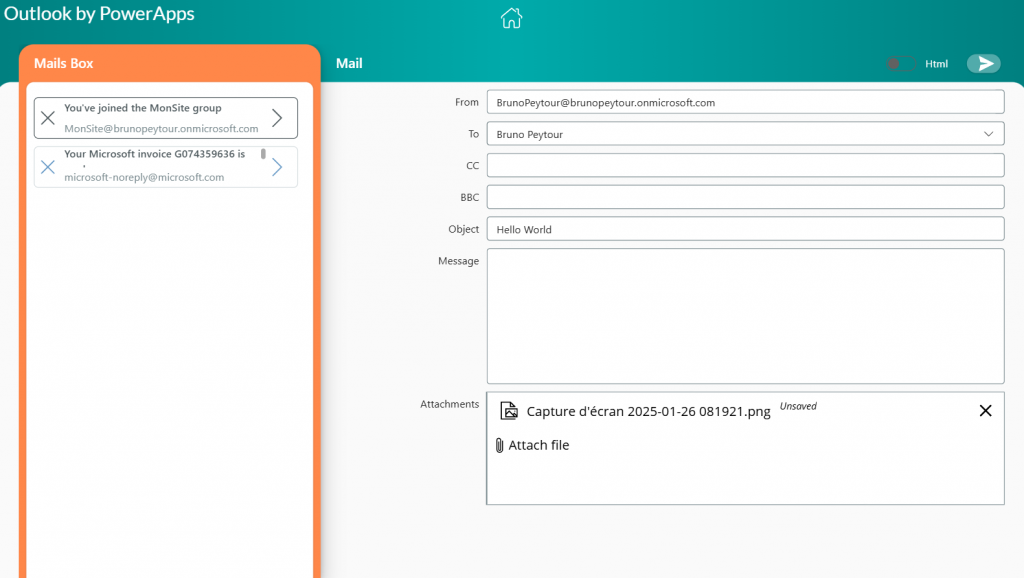
2. Add the following controls to a page :
| Type | Name | Values |
| Text | inOutlook_From | Value : User().Email |
| Text | inOutlook_Subject | |
| ComboBox | inOutlook_To | Items : Office365Users.SearchUser({searchTerm:Self.SearchText}) |
| Text | inOutlook_Message | Mode : SingleLine |
| Text Rich Editor | inOutlook_MessageHtml | Visible : inOutlook_IsHtml.Checked |
| Toogle | inOutlook_IsHtml | |
| Button | btnSend |
Your Canvas page could look like this :
Send Mail
- To send a basic message, add the following formulas to the button’s OnSelect property
Office365Outlook.SendEmailV2(
    inOutlook_To.Selected.Mail,
    inOutlook_Object.Value,
    inOutlook_Message.Value
)
Send Mail with BBC recipients
Office365Outlook.SendEmailV2(
    inOutlook_To.Selected.Mail,
    inOutlook_Object.Value,
    inOutlook_Message.Value,
    {
        Bcc:"bcc@mail.com"
    }
)
Send Mail with CC recipients
Office365Outlook.SendEmailV2(
inOutlook_To.Selected.Mail,
inOutlook_Object.Value,
inOutlook_Message.Value,
{
Cc:"cc@mail.com"
}
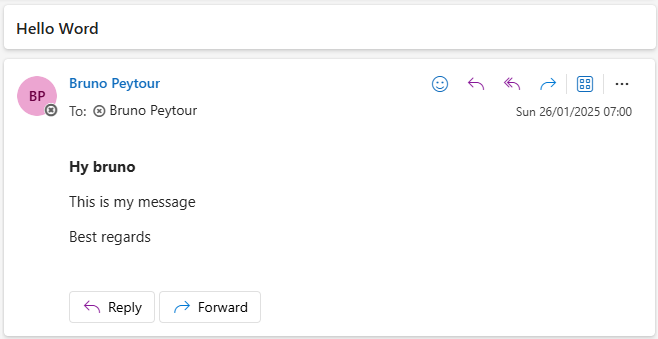
) Send Mail with HTML
You can add HTML code in Body Message, like this exemple :
Office365Outlook.SendEmailV2(
    inOutlook_To.Selected.Mail,
    inOutlook_Object.Value,
    "<p><b>Hy bruno</b></p>
    <p> This is my message</p>
    <p>Best regards</p>
    "
) 
Send Mail with Importance Markup
Add Importance Attribut to Options. There is 3 Importance levels: Hight, Low, Normal
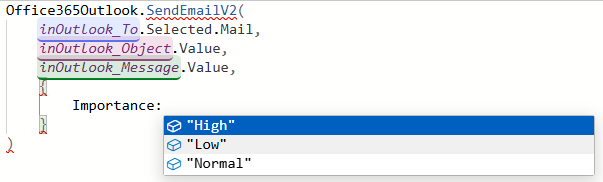
Office365Outlook.SendEmailV2(
    inOutlook_To.Selected.Mail,
    inOutlook_Object.Value,
    inOutlook_Message.Value,
    {
        Importance:"High"
    }
Send Mail with ReplyTo
Office365Outlook.SendEmailV2(
    inOutlook_To.Selected.Mail,
    inOutlook_Object.Value,
    inOutlook_Message.Value,
    {
        ReplyTo:"me@me.com"
    }
) 
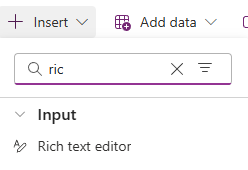
Send Mail with Rich Text Editor
1. Add a Rich text editor control (Insert > Rich text editor)
2. Rename this control with inOutlook_HtmlMessage
Now, change the OnSelect property :
Office365Outlook.SendEmailV2(
    inOutlook_To.Selected.Mail,
    inOutlook_Object.Value,
    inOutlook_HtmlMessage.HtmlText
)
3. Compose your message in PowerApps Page and Click Send Button. You could also paste a image in Rich Text Editor
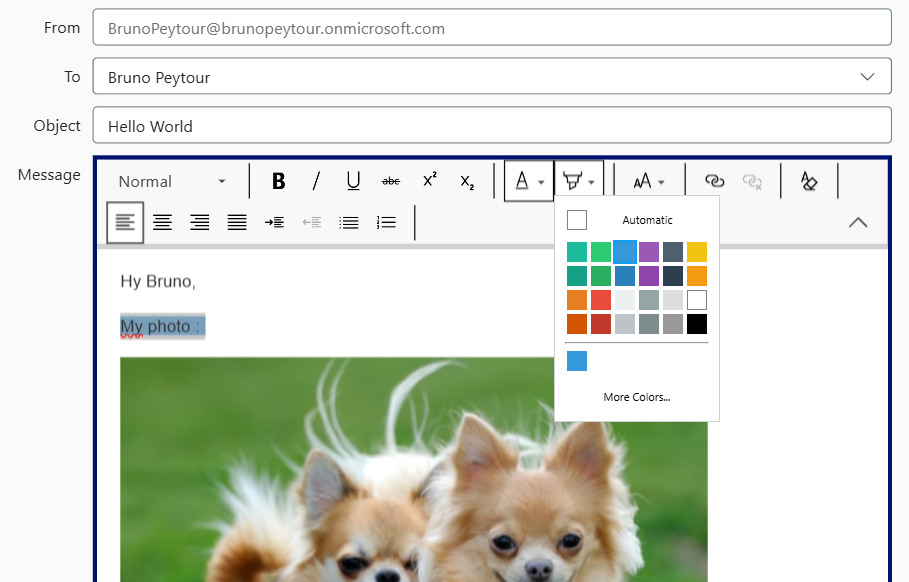
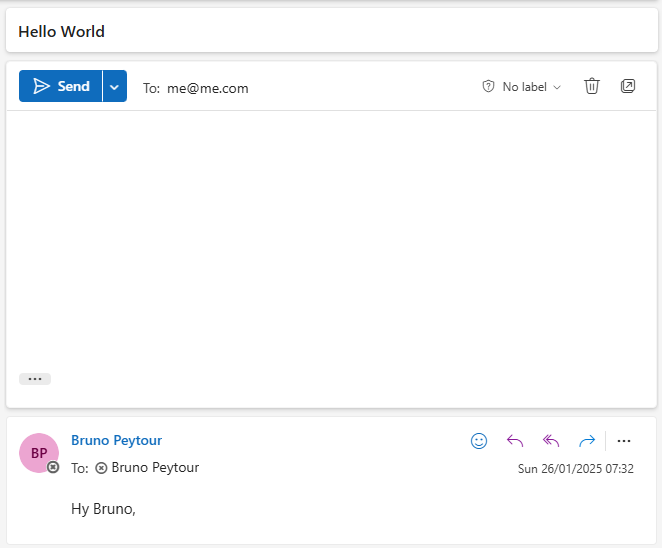
To send a Email with Image included
To send an image directly included in the Mail (forcing the image to be displayed) without the risk of Outlook blocking it, you need to include a Base64 encoded image in Html Code
To encode an image, visit https://www.base64-image.de/
Office365Outlook.SendEmailV2(
inOutlook_To.Selected.Mail,
inOutlook_Object.Value,
"<p><b>Hy bruno</b></p>
<p> This is my photo</p>
<img src='data:image/png;base64,[COPY_PAST_YOUR_BASE64_IMAGE]'>
<p>Best regards</p>
"
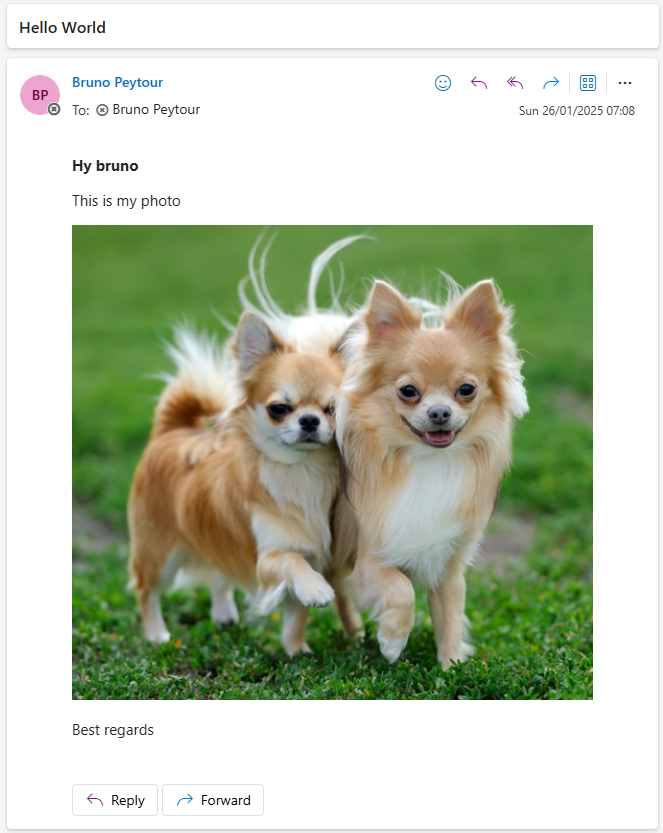
) The result :
Send Mail with Attachments by Attachment Control
The Attachments control is not natively available. You must copy The Attachment Control from a PowerApps Form linked to a SharePoint list.
Even Copy as Code doesn’t work !
Office365Outlook.SendEmailV2(
    inOutlook_To.Selected.Mail,
    inOutlook_Object.Value,
    inOutlook_Message.Value,
    {
        Attachments: ForAll(
            inOutlook_Attachment.Attachments,
            {
                ContentBytes: Value,
                Name: Name
            }
        )
    }
)
Send Mail with SharePoint Attachment
With a Item from a SharePoint List, you can attach a document from Attachment Field
Office365Outlook.SendEmailV2(
    inOutlook_To.Selected.Mail,
    inOutlook_Object.Value,
    inOutlook_Message.Value,
    {
        Attachments:
        {
                ContentBytes: First( LookUp( MyList, ID=1).Attachments).Value,
                Name: First( LookUp( MyList, ID=1).Attachments).DisplayName
        }
    }
)